
JUKEBOX STUDIO - Media player ARCHOS - Free user manual and instructions
Find the device manual for free JUKEBOX STUDIO ARCHOS in PDF.

| Product type | MP3 media player |
| Brand | ARCHOS |
| Model | JUKEBOX STUDIO |
| Storage capacity | 6 GB or 20 GB (depending on version) |
| Supported audio formats | MP3 |
| Dimensions (L × W × H) | 115 × 82 × 34 mm |
| Weight | 350 g |
| Power source | 4 rechargeable AA NiMH batteries (included) or AC adapter (included) |
| Playback time (batteries) | Up to 8 hours |
| Interface | USB 1.1 (transfer rate up to 1 MB/s) |
| Display | Backlit LCD screen |
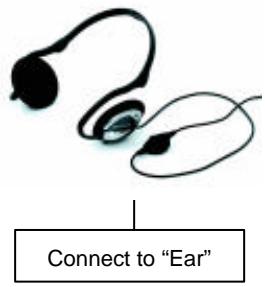
| Connectivity | 3.5 mm stereo headphone jack |
| Package contents | Jukebox, 4 NiMH batteries, USB cable, AC adapter, headphones, carrying case, software CD, quick start guide |
| Minimum PC configuration | Windows 98 SE or 2000, Pentium 233 MHz, 32 MB RAM, 30 MB free space, USB port |
| Minimum Mac configuration | Mac OS 8.6, iMac/G3, 32 MB RAM, USB port, USB Manager 1.2 |
| Included software | MusicMatch Jukebox (encoding and playlist management) |
| Features | Folder navigation, playback modes (Normal, Repeat, Shuffle, Scan), equalizer, firmware update |
| Maintenance | Avoid shocks, use only ARCHOS accessories, charge at room temperature |
| Safety | Do not expose to rain or humidity; maximum acoustic output 100 dB (with included headphones) |
| Repairability / Spare parts | Replaceable rechargeable AA NiMH batteries (ARCHOS model) |
| Warranty | Limited manufacturer warranty (see manual) |
| Standards | Compliant with FCC Class B, European directive NF/EN 50332-1 |
Frequently Asked Questions - JUKEBOX STUDIO ARCHOS
User questions about JUKEBOX STUDIO ARCHOS
0 question about this device. Answer the ones you know or ask your own.
Ask a new question about this device
Download the instructions for your Media player in PDF format for free! Find your manual JUKEBOX STUDIO - ARCHOS and take your electronic device back in hand. On this page are published all the documents necessary for the use of your device. JUKEBOX STUDIO by ARCHOS.
USER MANUAL JUKEBOX STUDIO ARCHOS
English - Table of Contents
Warranty andWarnings 3
Introduction To Jukebox 5
Operating the Jukebox 6
Jukebox Operation Modes 7
8
Jukebox Console : Functions and Operations 8
PC USB Driver and MusicMatchTM Software Installation 9
Installation of the MusicMatch™ Software, Pre-Installation of USB Drivers 10
for PC and MP3 encoding.
LCD Display Indicators & Functions 10
MAC USB Driver and MusicMatch™ Software Installation 11
MAC MusicMatchTM Software Installation & MP3 encoding 12
Jukebox Menu Flow Chart 13
Jukebox Menu Flow Chart Operations 14
Rapid Menu, Package Contents, System Requirements 15
Maintenance, Update the Firmware, Update with Windows 2000. 16
Changing NiMH Batteries 17
Trouble shooting 18
Customer Support 20
Warranty and Limited Liability
This product is sold with a limited warranty and specific remedies are available to the original purchaser in the event the product fails to conform to the limited warranty. Manufacturer's liability may be further limited in accordance with its sales contact.
In general, the manufacturer shall not be responsible for product damages caused by natural disasters, fire, static discharge, misuse, abuse, neglect, improper handling or installation, unauthorised repair, alteration or accident.
In no event shall the manufacturer be liable for loss of data stored on disk media.
MANUFACTURER SHALL NOT BE LIABLE FOR ANY SPECIAL, INCIDENTAL OR CONSEQUENTIAL DAMAGES. EVEN IF INFORMED OF THE POSSIBILITY THEREOF IN ADVANCE.
Please see your sales contract for a complete statement of warranty rights, remedies and limitation of liability.
Further, the warranty does not apply to :
- Damages or problems resulting from misuse, abuse, accident, alteration or incorrect electrical current or voltage.
Any product with a tampered-with or damaged warranty seal or serial number label. - Any product without a warranty or serial number label.
- Any batteries and all consumable items delivered with or in the equipment..
Warnings and Safety Instructions
CAUTION
To prevent risks of electric shock, this unit must only be opened by qualified service personnel. Power off and disconnect the power supply cable before opening the unit.
WARNING
- To prevent fire or shock hazard, do not expose the unit to rain or moisture.
- Use of this product is for personal use only. Copying CDs or downloading music files for sale or other business purposes is or may be a violation of copyright law.
ECC Warning Statement
FCC Compliance
This equipment has been tested and found to comply with the requirements for a class B digital device pursuant to Part 15 of the FCC regulations. These requirements are designed to provide reasonable protection against harmful interference in a residential area. This equipment generates, uses and can radiate radio frequency energy. If not installed and used in accordance with the manufacturer's instructions, it may cause harmful interference to radio communications. However, there is no guarantee that interference will not occur in a particular environment. If this equipment does cause harmful interference, to radio or television reception which can be determined by turning the equipment on and off. The user is advised to try to correct the interference by one or more of the following methods :
Reorient or relocate the receiving unit's antenna;
- Increase the distance between the equipment and the receiver;
- Connect the equipment to a different power outlet other than the one where the receiver is connected;
- Consult a certified television or radio technician for assistance.
CAUTION: Any changes or modifications not expressly approved by the manufacturer of this device will void the user's authority to operate the equipment.
FCC Part 15 - Operation is subject to the following two conditions :
- This device may not cause harmful interference;
- This device must accept any interference received including interference that may cause undesired operation.
Copyright Notice
Copyright ARCHOS © 2001 - All rights reserved.
This document may not, in whole or part, be copied, photocopied, reproduced, translated or reduced to any electronic medium or machine-readable form without prior consent, in writing, from ARCHOS.
All brands and products names are registered trademarks and the property of their respective owners. Specifications are subject to change without notification. Errors and omissions excepted. Images and illustrations may not always match contents. Copyright © ARCHOS. All rights reserved.
Disclaimer of warranty : To the extent allowed by applicable law, representations and warranties of non-infringement of copyrights or other intellectual property rights resulting from the use of the product under conditions other than as here above specified, are hereby excluded.
Introduction to ARCHOS Jukebox MP3 Player
6 000 or 20 000 minutes of MP3 music, 150 or 500 audio CD's or 1500 or 5000 songs in the palm of your hand.
Enjoy hours and hours of CD-quality music at the lowest cost. With a whopping storage capacity of
6 GB or 20 GB, it provides more than 100^ or 300^ hours of top quality MP3 music at 128kps. Merge your entire collection of MP3's and CD's into one tiny device and listen to all your music wherever you go. It is truly palm-sized, measuring only 115 × 82 × 34 ~mm ( 4.5'' × 3.2'' × 1.3'' ) and 350 ~g (12-ounce).
Caution: batteries must be charged at normal room temperature. Do not charge below 5^ (40^) or above 35^ (95^) .
Doubles As a USB Hard Drive
ARCHOS Jukebox connects to the computer through a very fast USB interface, up to 1 MB/sec sustained transfer rate, and adds a disk drive letter to your computer. No need for any special software to download songs to the Jukebox, just drag and drop MP3 and data files from Windows Explorer. You can use it as an external Hard Drive to backup your personal files and music that you can plug and play wherever you go. ARCHOS Jukebox currently offers support for MP3 format. Latest firmware that supports additional digital audio formats can be downloaded in the future.
Features and Benefits
- 6GB or 20GB hard drive, stores over 100 or 300 hours of CD-quality audio, or 150 or 500 albums and thousands of play lists
- Truly pocket-sized: 115 × 82 × 34 mm( 4.5^ × 3.2^ × 1.3^ ) with footing
- 350 g (12-ounce) lightweight device
- Enhanced hard disk shock protection based on proprietary shock sensing and emergency parking system
- Doubles up as a portable USB hard drive for your desktop or laptop computer. Plug and play everywhere you go.
- Adds a drive letter to your computer, Drag and drop songs and data files directly from Windows Explorer
- Included with MusicMatch™ MP3 player, encoder, playlist creator
- Powered from 4 x AA NiMH batteries for up to 8 hours playback
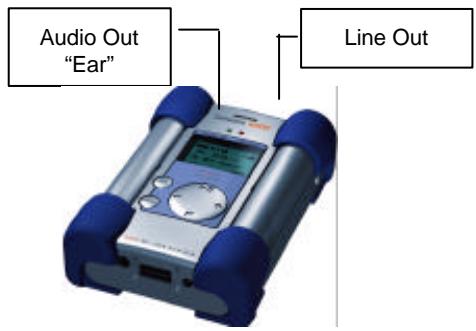
- Dual Stereo Line In and Line Out
- USB interface offers fast digital transfer rates, up to 1 MB/sec, quick connectivity and setup
- ARCHOS DC power adaptor for separate power supply and battery recharging
- Upgradeable firmware (internal product software) from www.archos.com
(*) depending on model
Operating the Jukebox
Before using the Jukebox for the first time, you are required to recharge the built in batteries for a minimum of 7 to 8 hours. You can also use the ARCHOS Jukebox with their power adaptor during charging.
Charging Batteries: (ONLY use the supplied ARCHOS power adaptor and the supplied batteries)
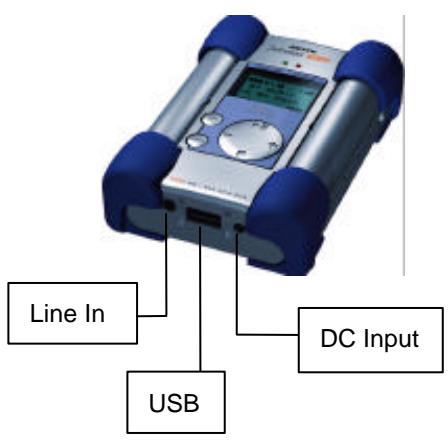
The batteries are required to be fully charged for 6 hours. Plug the ARCHOS DC power adaptor into an available wall outlet, then plug the mini power connector to the "DC In" of the Jukebox. While charging, the Jukebox can be used after an hour, charging time may then be increased up to 15 hours depending on the extent of use.
To Play MP3 tracks :
- Press the On button (until it appears on screen)
- MP3 track(s) will be listed on the LCD. Use + or - to move up and down. There are a number of MP3 tracks pre loaded on to your Jukebox.
- Press Play button to play MP3 tracks.
- Press Stop to stop playing. Hold down for more than 3 sec to Turn Off
Jukebox Operation Modes
There are basically 3 modes of operation: Browser, Audio and Menu
-
Browser Mode: This is the default mode after Jukebox has been turned on. Use (+) or (-) on the Jukebox to search for your MP3 songs or playlists. Use Play button to enter a directory or to play a playlist or a MP3 track. Use Stop Button to back out of a directory. The Browser Mode is entered in three ways:
-
at startup (Off then On)
- from Audio Mode by pressing Stop, or "ON" + "▶II"
- by pressing the Menu or On button to leave the Menu Mode
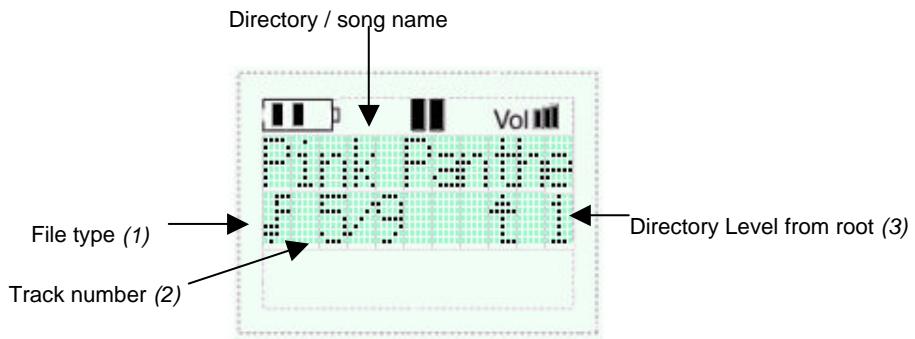
(1) Either : = MP3 music file = Directory = Playlist
(2) Track number: Track 5 out of 9 in the current directory
(3) number of times to press STOP (†) to get back to the root (root = 0).
- Audio Mode : One can enter into Audio Mode via Browser Mode only by pressing Play over any MP3 song or playlist. Pressing Play button will pause or resume playing. Pressing Fwd (+) once briefly to Skip Forward to the next song. Press Bwd (-) briefly to Skip Backward to the previous song. Pressing Stop button will stop playing and switch back to Browser Mode. A long press more than 2 seconds on (+) will scan Fast Forward and on (-) will scan Fast Reverse.
- Menu Mode : to select various settings (see flowchart). As explained above, Menu Mode can only be entered by pressing the Menu Button. Menu Mode is exited to Browser Mode by pressing the Menu or On button briefly.
The LCD backlight is switched off 20 seconds after the last button has been pressed. Press On or any other button briefly to re-activate the LCD backlight.
The Jukebox goes automatically off after one minute without use.
To turn on the Jukebox, press and hold the On button during more than 3 seconds until it appears on screen. To turn off the Jukebox, press and hold the "Stop" button for more than 2 seconds. The Jukebox will remain active when powered from the DC adapter until the Off button is pressed for more than 3 seconds.
Important : Carrying the Jukebox
The Jukebox is included with a carrying pouch. The Jukebox was designed to protect sudden impact. However, maximum protection is obtained using the pouch.
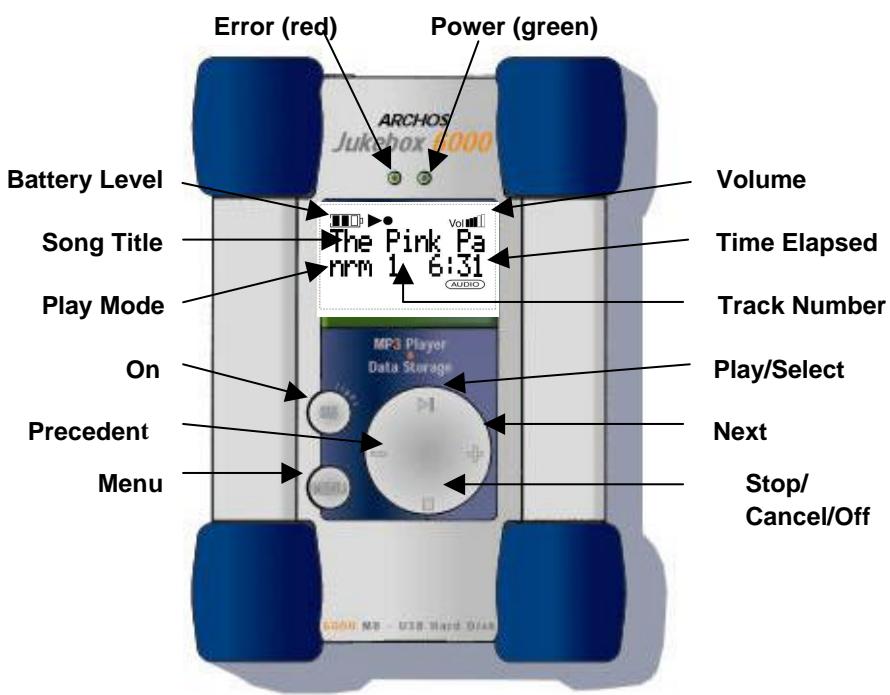
Jukebox Console Functions and Operations
| On | Press ON to turn on the Jukebox |
| Menu | Toggles between Menu & Browser & Audio modes Menu mode: change settings, see flowchart Browser mode: navigate your MP3 tracks. This is the default mode when Jukebox is turned on. Use +/- to move up and down; use Play and Stop buttons to select or cancel out Audio mode: plays MP3 tracks, or a playlist |
| Play (Play/Pause/ Select) | Plays MP3 tracks, playlist, to pause or resume playing, to select, or to enter a folder when in Browser mode. Use Stop button to go back or cancel out. |
| Stop (Off/Cancel-Out) | Stops playing; toggle between Audio & Browser Press and hold for 3 sec to turn off Jukebox. Stop button can be used to go back or cancel out in Browse mode. |
| Next (+) | Skipping forward when in audio mode. Long press will scan Fast Forward in audio mode; or used to move up or down. |
| Precedent (-) | Skipping backward when in audio mode. Long press will scan Fast Backward in audio mode; or used to move up or down. |
| Error Light | Red : indicates disk error |
| Power Light | Green when unit is turned on. |
PC USB Driver and MusicMatch™ Software Installation
Connecting Jukebox to PC & Adding MP3 Tracks to Jukebox
PC USB Driver Installation :
Pre6Install the USB Drivers (see following section) or do as following:
- Turn on your computer and wait until it has finished booting.
Gently connect one end of the USB cable to the Jukebox.
- Turn on the Jukebox. ARCHOS power adaptor may be required if there isn't enough power from the batteries.
- Connect the other end of the USB cable to a free USB port on computer.
A "Welcome to the Found New Hardware Wizard"(Win98se/2000) appears.
- Click on the Next button
- Select the Recommended option to search for best driver, and click Next
- Insert the included Jukebox software CD into your CDROM drive.
- Specify your CD-ROM Player and add \drivers\ for example d : \drivers\
- Click Next again when new hardware is found, and follow the on-screen instructions to complete the installation.
- Click Finish when prompted.
You will recognize an additional drive letter is added for the Jukebox
Note : If your Jukebox hard disk is not recognized, please refer to Trouble Shooting
Drag and Drop, or Copy and Paste your MP3 tracks to the Jukebox hard disk drive letter.
Click on the "peripheral" icon in the system tray Click on the pop-up windows asking for removal Wait until a message says removal is OK

14:23
- Disconnect the USB cable on both ends, and Play the MP3 Tracks (as shown in the above steps)

Installation of the MusicMatch™ Software and Pre-Installation of the USB drivers for PC:
MusicMatch™ software is included with the Jukebox. Indeed, you will find many useful options such as recording audio CD tracks to MP3, creating and saving a playlist that will allow you to play specific tracks of your favorite music on the Jukebox. Furthermore, you can download additional MP3 tracks from MusicMatch at http://www.musicmatch.com/get_music/
Installation of the MusicMatch™ Software and/or Pre-Installation of the USB Drivers:
- Insert the CD software included with your CDROM Player
- Wait for the start of the setup software
- Click on MusicMatch French in order to install MusicMatch or Pre-Install the USB Drivers, in order to pre-install the USB Drivers then click OK
- Follow the instructions on the screens to complete the installations, and Restart your computer
PC MusicMatch™ Recorder : MP3 Encoding
MusicMatch™ Recorder can be used to convert audio CD tracks into MP3 tracks for your Jukebox.
- Insert your audio cd into your CDROM drive.
- Recorder will display your audio tracks on the right pane (if you don't have Recorder, click Options/View and check Show Recorder).
- Check the box next to each track that you want to convert to MP3 tracks.
- Click Options/Settings/Recorder/ and select MP3 128.
- Click Songs Directory and specify location where music will be saved.
- Click Ok's back, and Click on Start button to convert audio tracks into MP3 files.
To use the software MusicMatch™ and create your playlists, please refer to the user's guide integrated into the software.
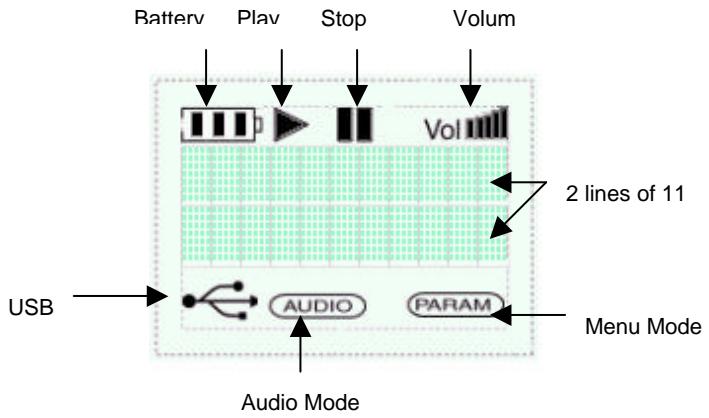
Jukebox LCD Display
| Battery | Shows remaining power in 4 levels. |
| Play | Play/Pause in Audio mode. Lit when plays, or blinks when paused. In Browser mode, the icon is turned off. |
| Stop | In Audio Mode, Stops playing or hold for 3 sec to turn off. In Browser and Menu modes, icon is lit. |
| Fwd/Bwd | In Audio Mode, icon blinks in Fast Forward or Fast Reverse; otherwise, it is not showed. |
| Volume | Indicates low and high sound in 6 levels. |
| USB | On when the Jukebox is connected to the computer via the USB cable. Note: Other functions are not available when USB cable is connected. |
| AUDIO | On when in Audio mode, and off otherwise. |
| PARAM | On when in Menu mode and off otherwise. |
MAC USB Driver and MusicMatch™ Software Installation
Connecting Jukebox to MAC & Uploading MP3 Tracks
MAC USB Driver Installation
- Turn on your computer and wait until it has finished booting.
Gently connect one end of the USB cable to the Jukebox. - Turn on the Jukebox. ARCHOS power adaptor may be required if there isn't enough power from the batteries.
- Connect the other end of the USB cable to a free USB port on your computer.
- Insert the included software CD into your CDROM drive
Double click on the software CD shows on your computer desktop - Double click on the ARCHOS USB Driver Installer
- Follow the on-screen instructions, then Restart your computer
You should recognize an additional hard disk icon displayed on the desktop - Drag and Drop MP3 tracks to Jukebox Drive
- Disconnect the USB cable on both ends, and play the MP3 tracks
Note: Your Mac system will recognize the Jukebox hard disk automatically if you have PC Exchange Installed. If not, you will have to re-format the Jukebox hard disk for Mac to recognize. To format, highlight the New Recognized Hard Disk and click on Erase Disk under "Special" Mac Menu. MAC disk utilities may be required to partition the hard disk in some cases.
MAC MusicMatch™ Software Installation :
MusicMatch™ software is included with the Jukebox. Indeed, you will find many useful options such as recording audio CD tracks to MP3, creating and saving a playlist that will allow you to play specific tracks of your favorite music on the Jukebox. Furthermore, you can download additional MP3 tracks from MusicMatch at http://www.musicmatch.com/get_music/
- Insert the Jukebox software CD into your CDROM drive
- Double click on the CD icon (just being mounted on the desktop).
- Double click on MusicMatch Jukebox software to install
- Follow the on-screen instructions to complete the installation and restart your computer
- Double click on the MusicMatch folder, and launch MusicMatch Jukebox
MAC MusicMatch™ Recorder : MP3 Encoding
MusicMatch™ Recorder can be used to convert audio CD tracks into MP3 tracks for your Jukebox.
- Insert your audio CD into your CDROM drive
- Recorder will display your audio tracks on the right pane.(if you don't have Recorder, click Window on the top menu, and check Show Recorder)
- Check the box next to each track that you want to convert to MP3 tracks
- On the menu, click Controls/Recorder/Settings/Recorder
- Click Change under "Song File Path Format" to specify the location where your music will be saved
- Click Apply, then OK
- Click the red Rec button to convert audio tracks into MP3 files.
To use the software MusicMatch™ and create your playlists, please refer to the user's guide integrated into the software.
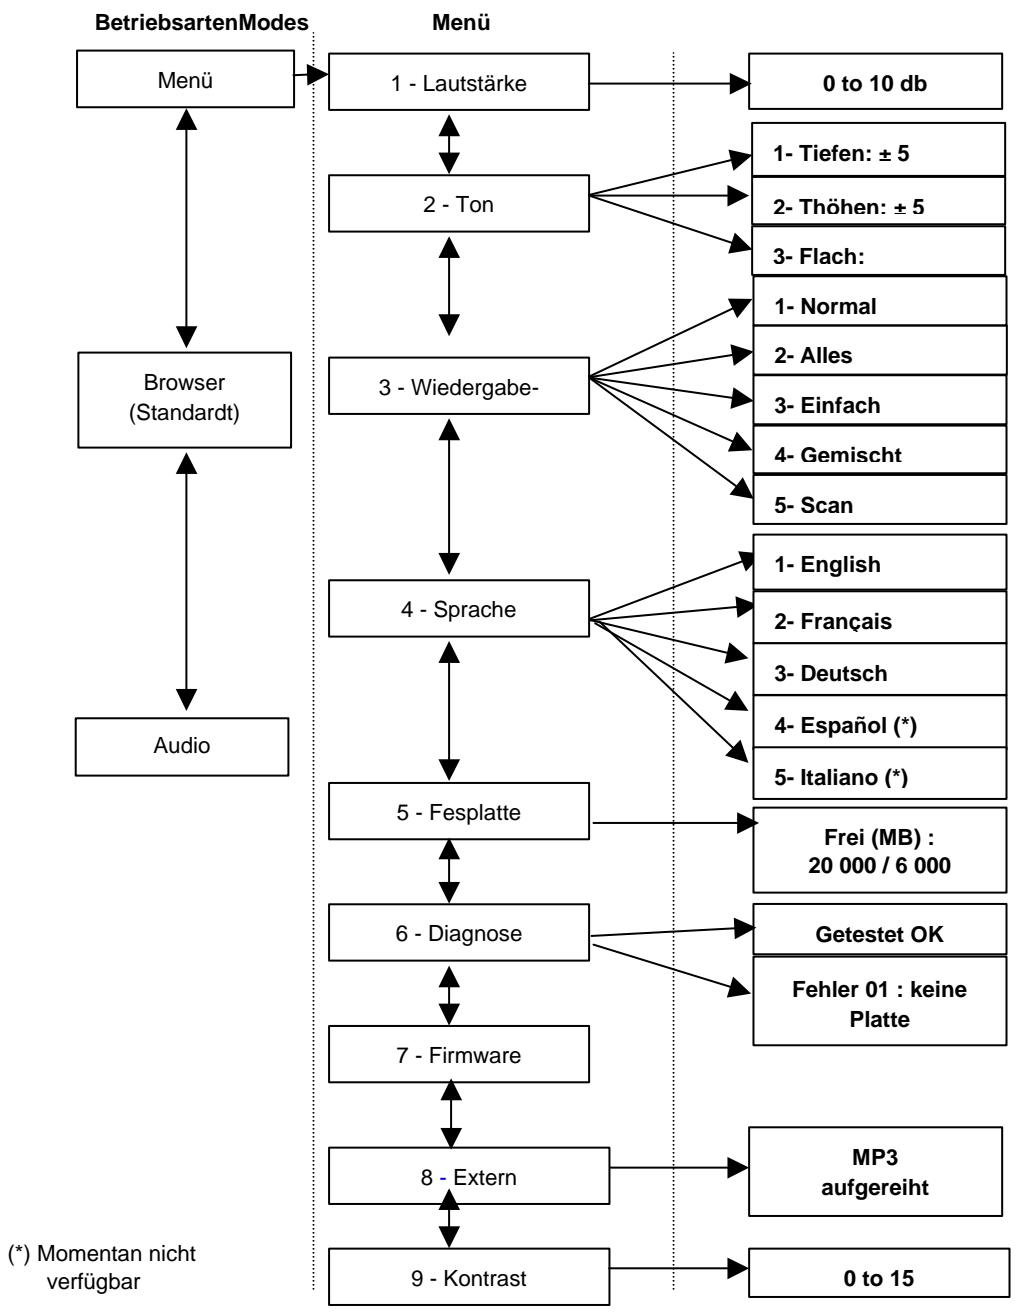
Jukebox Menu Flow Chart
Following the below flow chart you can change various settings of the Jukebox to your preferences under Menu options. Turn on your Jukebox, press Menu button on the Jukebox to access the Menu options. Use + or - buttons to navigate up and down. Use Play or Stop buttons to select or cancel out. For other modes, please refer to "Jukebox Operation Modes" page 6.
Menu Mode Options
| Volume | This option allows to change and set the default sound level. This option is your volume control. Use this option to change the sound level when it is necessary |
| Sound | Sound equalizer. Allows to boost or reduce Bass or Treble, or set it to Flat option for no Bass/Treble added |
| Play Mode | Has five options; Normal – plays one after another, Repeat All – replays all MP3 tracks, Single – plays one track over and over, Shuffle – plays any random track until all tracks are played, Scan – plays MP3 tracks quickly |
| Language | Is solely prompted to be selected the first time the Jukebox is used. Language can be changed to other languages afterward by going through the menu option and select language to change to either English, French, German, Spanish, or Italian |
| Hard Disk | Select this option to check the amount of used space or available space of the hard disk |
| Diagnose | Use this option test the condition of the hard disk. The result will be either “OK” or “Failed”. If there is any problem with the hard disk, connect it to your computer and run scandisk or other disk utilities to fix the problem. |
| Software | Allows to screen the version of the internal software |
| External | Allows to use the Jukebox slaved together with another audio hardware on a HI-FI (in case you do not have just one analog entry and in case it is already used by another peripheral). |
| Contrast | Modification of the contrast |
Jukebox Menu Flow Chart Operations

(*) Not available for the moment.
Rapid Menu
- ARCHOS Jukebox with pre-installed 4 x AA NiMH rechargeable batteries
- USB cable
- ARCHOS DC power adapter
-
Stereo Headphones
-
Carrying pouch
- Software Installation CD
- Quick Start Guide (this manual)
System Requirements for PC
- Microsoft Windows 98 SE or Windows 2000
- 233 MHZ or higher Pentium
- 32 MB RAM (64 MB recommended)
- 30 MB free space
- USB port
- Internet connection for internet MP3 downloading (optional)
System Requirements for MAC
- Mac OS version 8.6 or higher
- iMac, G3 or higher
- 32MB RAM (64 MB recommended)
- USB port
- USB Manager version 1.2 or higher
- Internet connection for Internet MP3 downloading (optional)
Maintenance
- Avoid sudden impact of the unit
- Use ONLY the power adapter and NiMH AA batteries supplied by ARCHOS
- Use ONLY the power adapter to recharge your Jukebox, not others
- You can connect the Jukebox to your computer at any time either before or after boot-up. Make sure the USB cable is connected to Jukebox first, turn on Jukebox, then connect the USB cable to your computer USB port. Reverse the order for disconnecting.
- For proper operation of the Jukebox, the unit has to be inserted upside down in its pouch.
Update of the Firmware (Internal Software Jukebox)
- Start the installation program and follow the instructions on screen
- Download the update from the web site: www.archos.com
- Make sure that the Jukebox is connected to the PC and is under power
- Double-click on the file
- The update interface is screened
- Click OK
- Wait until the message « Updated » is screened
- Validate and close the window
- Click on the peripheral icon of the system bar and follow the instructions
- Disconnect the USB cable from the Jukebox
- Put the Jukebox off power
- Re-start - your equipment is updated
- By caution, check the version appearing on screen
If you use Windows 2000
- Download the update from the web site: www.archos.com
- Make sure that the Jukebox is connected to the PC and is powered
- Re-name the downloaded file « ARCHOS.mod »
- Drag the file « ARCHOS.mod » on the root of the Jukebox
- Click on the peripheral icon on the tools bar and follow the instructions
- Disconnect the USB cable from the Jukebox
- Put the Jukebox off power
- Re-start - your equipment is updated
- By caution, check the version appearing on screen
Changing Batteries
Jukebox is equipped with 4 × AA NiMH Rechargeable batteries. The batteries are required to be changed only when they can no longer hold charge. Use ONLY ARCHOS AA NiMH rechargeable batteries. To remove the batteries covers, locate the small holes, one on each side, on the inner top middle of the batteries covers (see picture below). Use a small flat screwdriver or the like and gently, slowly push the battery covers out sideways just far enough to lift up the battery covers by the top end of the cover.
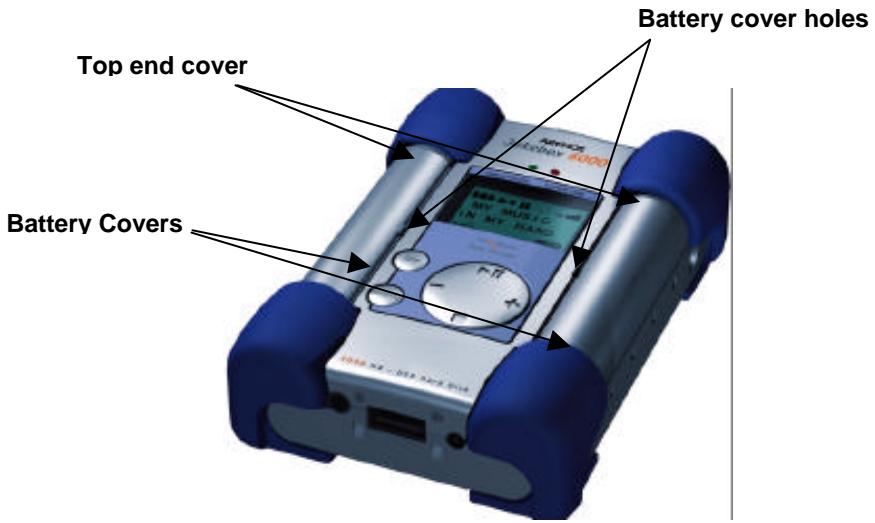
Since the batteries are tightly fit in the compartments, remove the bottom battery first while gently holding down the blue cushion rubber to keep it from falling out of place.
Reverse the procedure to replace the batteries. Make sure new batteries polarities (+ and -) are aligned correctly with the + and - markings as printed behind the batteries covers.
Repeat the procedure for the other side.
Important: Failing to insert the batteries correct could damage the Jukebox.
Trouble Shooting :
Problems
Solutions
| Jukebox Hard Disk is not recognized after USB drivers are installed on PC | - Make sure to restart your computer |
| Jukebox Hard Disk is not recognized after USB drivers are installed on MAC | - Make sure to restart your computer - Enable PC Exchange. If you don’t have PC Exchange. The hard disk needs to be formatted under MAC or use MAC disk utility to partition and format the Jukebox hard disk |
| The Jukebox is not started or shows an error on disk | - The batteries might have a low level : charge them with the supplied adaptor |
| Jukebox will not turn on or will not play : | - Recharge the Jukebox using Only ARCHOS included power adaptor. - Check Battery Levels on LCD. - Jukebox is disable when USB cable is connected |
| Can’t find or play the Playlist : | - Make sure the playlist is saved on the Jukebox 6 000 drive or manually copy the playlist to the Jukebox. The default location of playlist is located at : C:\ProgramFiles\MusicMatch\MusicMatch Jukebox\ Playlist\Default Make sure that the MP3 files are in the Jukebox |
| The computer is blocked: | - Make sure to stop accessing the Jukebox before disconnecting the USB cable. - Never remove the USB connector or the power jack before removing your Jukebox from computer port. |
| Problems | Solutions |
| Jukebox is not recognized : (Check additional USB Issues below) | - Connect USB cable to Jukebox first, turn Jukebox On, then connect USB cable to computer, in the exact order - Not enough battery power, try to use the included ARCHOS DC power adapter. - Make sure USB driver has been installed. |
| USB Issues : | - If you are connected through a USB hub, ensure that the hub is connected and powered on. - Check that you are not connected to a USB port repeated through a keyboard. - Try to connect to the USB port directly without going through a USB hub. |
| Can’t Access Jukebox Drive : | - Out of battery power, use ARCHOS DC power adapter to recharge and to power on unit. |
Customer Support
If you need help with your Jukebox unit, please contact the place of purchase.
If you need additional help, you may contact ARCHOS directly via the Web or by phone.
Technical Support
United States & Canada
Europe & Asia
ARCHOS Technology
15375 Barranca Parkway, Suite J 101
Irvine, CA 92618
USA
ARCHOS S.A.
12, rue Ampère
91430 Igny
France
Phone:(949)453-1121
Fax: (949) 453-1139
Phone number for USA and Canada :
(949) 453-1121
(support into english)
Phone: +33 169 33 1690
Fax: +33 169 33 169 9
Free phone number for France, United
Kingdom, Germany, Spain, Italy :
0080000123400
(support into French)
technical-support@archos.com
support-technique@archos.com
http://www.archos.com
15375 Barranca Parkway, Suite J 101
Irvine, CA 92618
USA
Europe et Asie
ARCHOS S.A.
12, rue Ampère
91430 Igny
France
Tél.: (949) 453-1121
Télécopie: (949) 453-1139
support-technique@archos.com
http://www.archos.com
Jukebox Menu Flow Chart Operations
Kurzmenu
15375 Barranca Parkway, Suite J 101
Irvine, CA 92618
USA
ARCHOS S.A.
12, rue Ampere
91430 Igny
France
Telefon: (949) 453-1121
Fax:(949)453-1139
support-technique@archos.com
http://www.archos.com
Espanol – Única de Contents
15375 Barranca Parkway, Suite J 101
Irvine, CA 92618
USA
Tel.: (949) 453-1121
Fax: (949) 453-1139
support-technique@archos.com
http://www.archos.com
Italiano - Indice
15375 Barranca Parkway, Suite J 101
12, rue Ampère
Irvine, CA 92618
91430 Igny
USA
France
Phone: (949) 453-1121
Phone: +33 169 33 1690
Fax: (949) 453-1139
Fax: +33 169 33 169 9
support-technique@archos.com
http://www.archos.com